こんにちは。ゲームプログラマーのメガネです。
この記事では、iOSやAndroid向けのアプリを開発できるFlutterを利用して、リバーシを作る工程を解説します。
新しい言語や開発環境を学ぶときに、ある程度仕様を把握することは必要ですが、とりあえず何かを作ってみるのが圧倒的な成長に繋がります。
実は私もFlutterを使うのははじめてで、このリバーシを作りながら学びました。その知見を共有しますので、長いですが最後まで読んでもらえると嬉しいです。
完成したリバーシ
はじめに、完成したリバーシを公開します。Web用にパブリッシュしました。
右下の「ゲームをはじめる」で開始します。白と黒が交互においていき、どちらもおけなくなったら終了です。
ソースコードはこちらです。
https://github.com/meganeprog/flutter_reversi
FlutterはiOS/Androidのアプリ開発を楽にするフレームワーク
Flutter(フラッター)はGoogleが開発した、クロスプラットフォーム対応のフレームワークです。
ネイティブアプリ開発において、iOSはSwift、AndroidはKotlinのように、それぞれ別の言語で開発する必要がありました。Flutterを使用することで大部分を共通のコードで書けるため、様々なプラットフォーム向けのアプリを楽に開発できるようになります。
対応するプラットフォームは以下のとおり。
- iOS
- Android
- Webアプリケーション
- Windows
- Mac
- Linux
プログラム言語はDartです。あまりメジャーではないですが、JavaやC++に近いオブジェクト思考言語です。オブジェクト思考言語を触ったことのある人は、すんなり覚えられると思います。
Flutterの環境構築
こちらを参考に。
https://www.sejuku.net/blog/123973
プロジェクトの作成
ではここから、リバーシの作り方を解説していきます。とりあえずプロジェクトの作成です。
Visual Studio Codeを起動して、メニューバーの「表示」から「コマンドパレット」を選択します。

コマンドパレットに「Flutter」と入力し、「Flutter: New Project」を選択します。
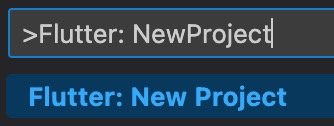
「Application」を選択します。

フォルダを選択します。
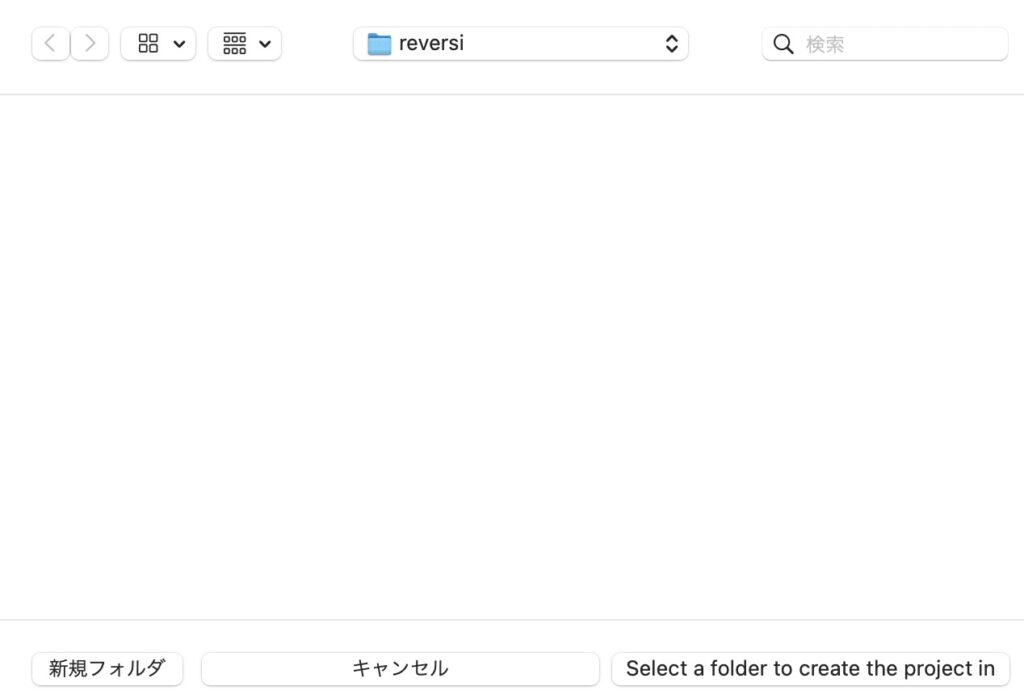
プロジェクト名を入力します。「reversi」と入力しEnterキーで決定します。

プロジェクトが作成され、初期化処理が行われます。
タイトルとゲームを遷移させる
今回のリバーシは、タイトル画面とゲーム画面だけのシンプルな画面構成です。
タイトル画面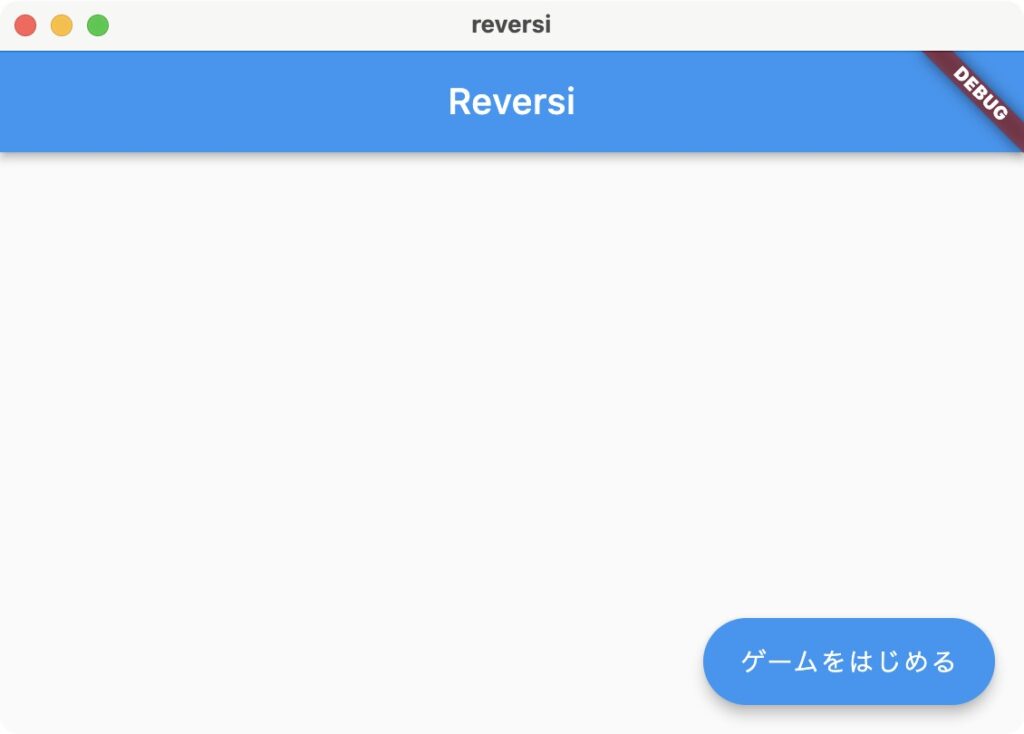 | ゲーム画面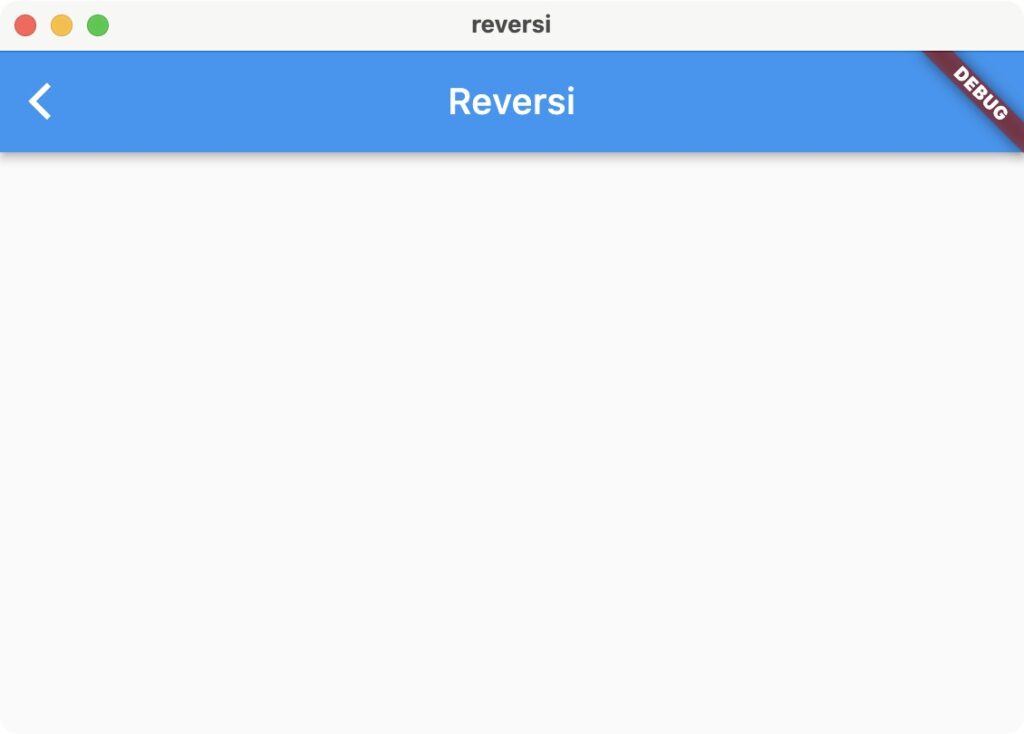 |
タイトルで「ゲームをはじめる」ボタンを押すと、ゲーム画面に遷移してゲームを開始します。ゲームを終了するときは、AppBarの左上の戻るボタンでタイトルに戻ります。
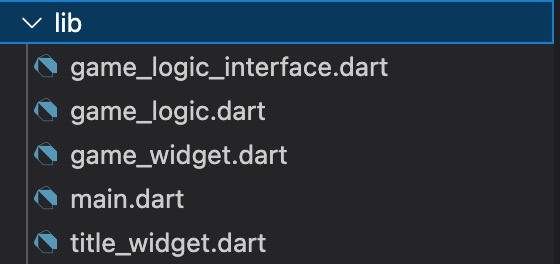
機種共通のコードはlib以下に配置します。今回のリバーシのコードは全てlib以下に配置しますので、以下の構成になります。
ゲーム画面のWidgetを作成
中身は後で実装するので、とりあえずゲーム画面のガワを作ります。
import 'package:flutter/material.dart';

class GameWidget extends StatelessWidget {
  const GameWidget({super.key});

  @override
  Widget build(BuildContext context) {
    return Scaffold(
      appBar: AppBar(
        title: const Text('Reversi'),
      ),
    );
  }
}
タイトル画面のWidgetを作成
タイトル画面を作ります。タイトルは「ゲームをはじめる」ボタンが1つだけあり、押されたらゲーム画面に遷移するシンプルなものです。
画面遷移にはNavigator.pushNamedを使います。
import 'package:flutter/material.dart';

class TitleWidget extends StatelessWidget {
  const TitleWidget({super.key});

  @override
  Widget build(BuildContext context) {
    return Scaffold(
      appBar: AppBar(
        title: const Text('Reversi'),
      ),
      floatingActionButton: FloatingActionButton.extended(
        onPressed: () {
          Navigator.pushNamed(context, 'game');
        },
        backgroundColor: Colors.blue,
        label: const Text('ゲームをはじめる'),
      ),
    );
  }
}
タイトルとゲームを行き来できるようにする
main.dartを以下のように変更します。routesに画面と名前を登録しておくことで、Navigator.pushNamed(context, 'game');のように名前で画面を遷移できるようになります。
Navigator.pushという命令でも遷移できるのですが、そうすると遷移先のクラスに依存してしまいます。コードを書くときは、できるだけ依存を減らすのが鉄則です。なのでpushNamedを利用りています。
Navigator.pushNamed(context, 'game');import 'package:flutter/material.dart';

import 'title_widget.dart';
import 'game_widget.dart';

void main() {
  runApp(MyApp());
}

class MyApp extends StatelessWidget {
  MyApp({super.key});

  // This widget is the root of your application.
  @override
  Widget build(BuildContext context) {
    return MaterialApp(
      title: 'Reversi',
      theme: ThemeData(
        primarySwatch: Colors.blue,
      ),
      routes: {
        'title': (context) => const TitleWidget(),
        'game': (context) => GameWidget(),
      },
      home: const TitleWidget(),
    );
  }
}
おめでとうございます。これで、タイトルとゲームを行き来できるようになりました。
ゲームロジックのインターフェース
クラスをできるだけ依存させないのは、オブジェクト指向プログラミングの定石です。依存が少ないほどテストがしやすくなり、運用や保守をしやすくなります。
では、どのように依存を断ち切れば良いのかというと、インターフェースに依存させることです。インターフェースを介して具体的な実装を意識しなくても良いように作ります。
/// 石の状態
enum Stone {
  blank,      /// 何も置かれていない
  white,      /// 白
  black,      /// 黒
  whiteHint,  /// 白石を置く候補
  blackHint,  /// 黒石を置く候補
}

/// 石のポジションをあらわすクラス
class Position {
  int row = 0;
  int column =0;
  Position(this.row, this.column);
}

/// ゲームロジックのインターフェース
abstract class GameLogicInterface {
  /// 初期化
  void init();

  /// ボードの行数を取得する
  int get boardRows;

  /// ボードの列数を取得する
  int get boardColumns;

  /// 現在の番を取得する
  Stone get turn;

  /// 指定された場所の石を取得する
  Stone getStone(int row, int column);

  /// 置かれている石の数を取得する
  int numberOfStone(Stone stone);

  /// 指定された場所に石がおける場合に、裏返せる場所のリストを返す
  ///
  /// 置ける場合は、裏返せる場所のリストを返す
  /// 置けない場合は、空のリストを返す
  List<Position> getReversePositions(int row, int column, Stone stone);

  /// 指定された場所に石を置く
  void putStone(int row, int column, Stone stone);

  /// 指定された場所の石を裏返す
  void reverseStone(int row, int column);

  /// 次のターンへ
  ///
  /// 双方とも打ち手がなくなったら false を返す
  bool changeTurn();

  /// 現在のターンで配置可能な場所にヒントを設定する
  void hint();

  /// ヒントをクリアする
  void clearHint();
}
ゲームロジックの実装
ここからゲームロジックの実装を解説します。
インターフェースを実装
GameLogicInterfaceを実装したGameLogicクラスを作成します。
implementsキーワードに続けて親クラスを書くことで、実装を行うことができます。
import 'game_logic_interface.dart';

/// ゲームロジックの実装
class GameLogic implements GameLogicInterface {
  ...
}
ボードの初期化
Dartは配列をListであらわします。リバーシのボードは8×8マスなので、2次元配列を定義します。[]を代入することで、配列を直接初期化できます。
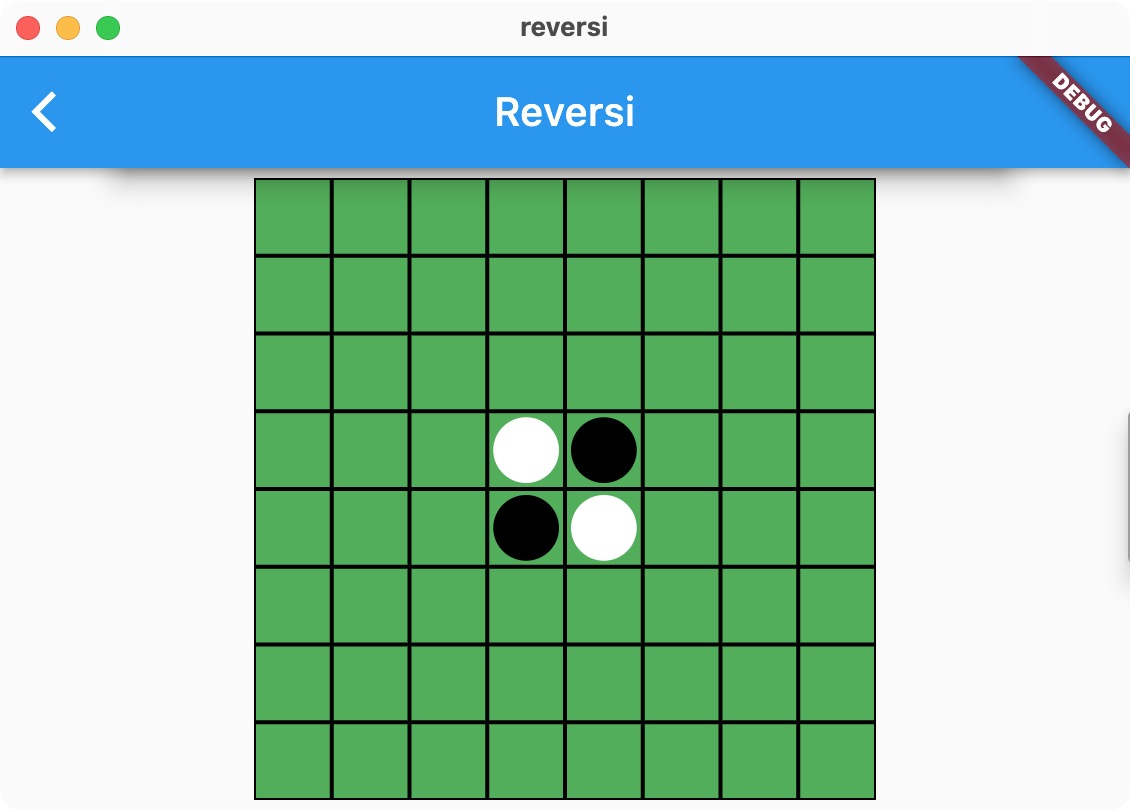
リバーシは中央の4マスに白と黒の石が2つずつ初期配置されますので、その位置に白と黒を置いています。Stone.blankとStone.blackが紛らわしいですが……、同じ文字数に揃えて配列を見やすくしています。
@overrideで親クラスの関数をオーバーライドできます。
  late List<List<Stone>> _board;  /// ボード

  /// 初期化
  @override
  void init() {
    _turn = Stone.white;
    _board = [
      [Stone.blank, Stone.blank, Stone.blank, Stone.blank, Stone.blank, Stone.blank, Stone.blank, Stone.blank],
      [Stone.blank, Stone.blank, Stone.blank, Stone.blank, Stone.blank, Stone.blank, Stone.blank, Stone.blank],
      [Stone.blank, Stone.blank, Stone.blank, Stone.blank, Stone.blank, Stone.blank, Stone.blank, Stone.blank],
      [Stone.blank, Stone.blank, Stone.blank, Stone.white, Stone.black, Stone.blank, Stone.blank, Stone.blank],
      [Stone.blank, Stone.blank, Stone.blank, Stone.black, Stone.white, Stone.blank, Stone.blank, Stone.blank],
      [Stone.blank, Stone.blank, Stone.blank, Stone.blank, Stone.blank, Stone.blank, Stone.blank, Stone.blank],
      [Stone.blank, Stone.blank, Stone.blank, Stone.blank, Stone.blank, Stone.blank, Stone.blank, Stone.blank],
      [Stone.blank, Stone.blank, Stone.blank, Stone.blank, Stone.blank, Stone.blank, Stone.blank, Stone.blank],
    ];
  }
ボードの行数と列数
ボードの行数と列数を取得するゲッターです。
ゲッターはgetキーワードを付けて定義します。関数としてgetXXXと定義しても結果は同じですが、ゲッターを使った方が実行効率が良いです。
  /// ボードの行数を取得する
  @override
  int get boardRows => _board.length;

  /// ボードの列数を取得する
  @override
  int get boardColumns => _board[0].length;
ターンの取得
現在白の番なのか黒の番なのか、ターンを取得するゲッターです。
_から始まる変数はプライベート変数です。プライベートにしておくことで、クラス外からのアクセスを禁止します。基本的には全てのメンバー変数はプライベートで問題なく、公開したい場合にゲッターを定義します。
  Stone _turn = Stone.white;  /// ターン

  /// 現在のターンを取得する
  @override
  Stone get turn => _turn;
指定の場所の石を取得
ボード上で指定された行、列の石を取得します。
assertはデバッグ中に条件がfalseになったときに、プログラムを停止させる命令です。停止した場合には、「アサーションに失敗した」と言います。assertを仕込んでおくことで、プログラマーが関数を誤って使用したことを早期に発見できます。
ここでは、行と列が範囲外の場合にアサーションに失敗するようにしています。
  /// 指定された場所の石を取得する
  @override
  Stone getStone(int row, int column) {
    assert(row >= 0 && row < boardRows && column >= 0 && column < boardColumns);
    return _board[row][column];
  }
置かれている石の数を取得
stoneにStone.whiteかStone.blackを指定して、置かれている石の数を取得します。
for (var 変数 in 配列)という書き方で、配列の要素を巡回できます。
  /// 置かれている石の数を取得する
  @override
  int numberOfStone(Stone stone)
  {
    int count = 0;
    for (var rows in _board) {
      for (var item in rows) {
        if (item == stone) {
          count++;
        }
      }
    }
    return count;
  }
石を置いた場合に裏返せる場所のリストを取得
指定の場所に石を置いた場合に、裏返せる石をリストアップします。縦横斜めを力技で調べているだけの、単純なアルゴリズムです。
_から始まる関数はプライベートメンバー関数です。変数と同様にクラスの外からは見えなくなります。具体的な実装を隠蔽する場合はプライベートにします。
  /// 指定された場所に石がおける場合に、裏返せる場所のリストを返す
  ///
  /// 置ける場合は、裏返せる場所のリストを返す
  /// 置けない場合は、空のリストを返す
  @override
  List<Position> getReversePositions(int row, int column, Stone stone) {
    assert(row >= 0 && row < boardRows && column >= 0 && column < boardColumns);
    assert(stone != Stone.blank);
    List<Position> reversePositions = List<Position>.empty(growable: true);
    reversePositions.addAll(_getReversePositions(row, column, -1,  0, stone));  // 左方向
    reversePositions.addAll(_getReversePositions(row, column,  1,  0, stone));  // 右方向
    reversePositions.addAll(_getReversePositions(row, column,  0, -1, stone));  // 上方向
    reversePositions.addAll(_getReversePositions(row, column,  0,  1, stone));  // 下方向
    reversePositions.addAll(_getReversePositions(row, column, -1, -1, stone));  // 左上方向
    reversePositions.addAll(_getReversePositions(row, column, -1,  1, stone));  // 左下方向
    reversePositions.addAll(_getReversePositions(row, column,  1, -1, stone));  // 右上方向
    reversePositions.addAll(_getReversePositions(row, column,  1,  1, stone));  // 右下方向
    return reversePositions;
  }

  List<Position> _getReversePositions(int row, int column, int rowDir, int columnDir, Stone stone) {
    Stone oppositeStone = stone == Stone.white ? Stone.black : Stone.white;
    List<Position> reversePositions = List<Position>.empty(growable: true);
    while (true) {
      row += rowDir;
      column += columnDir;
      if (row < 0 || row >= boardRows || column < 0 || column >= boardColumns) {
        // 端に到達したら置けない
        return List<Position>.empty();
      }
      if (_board[row][column] == oppositeStone) {
        // 進行方向に別の色の石があればリストに追加
        reversePositions.add(Position(row, column));
      }
      else if (_board[row][column] == stone) {
        // 1個でも別の色の石があれば置ける
        return reversePositions;
      }
      else {
        // 何も置かれていない場所に到達したら置けない
        return List<Position>.empty();
      }
    }
  }
指定の場所に石を置く
指定の場所に石を置く関数です。
  /// 指定された場所に石を置く
  @override
  void putStone(int row, int column, Stone stone) {
    assert(row >= 0 && row < boardRows && column >= 0 && column < boardColumns);
    assert(stone == Stone.black || stone == Stone.white);
    _board[row][column] = stone;
  }
指定の場所の石を裏返す
白を黒に、黒を白に裏返します。
  /// 指定された場所の石を裏返す
  @override
  void reverseStone(int row, int column)
  {
    assert(row >= 0 && row < boardRows && column >= 0 && column < boardColumns);
    assert(_board[row][column] == Stone.black || _board[row][column] == Stone.white);
    _board[row][column] = _board[row][column] == Stone.white ? Stone.black : Stone.white;
  }
次のターンにチェンジ
今が白の番だったら黒に、黒の番だったら白に変更します。白の人が置いた後に、黒が置けない場合は、もう一度白の番になるようにしています。
どちらも置けなくなったらfalseを返しており、その場合はゲーム終了です。
  /// 次のターンへ
  ///
  /// 双方とも打ち手がなくなったら false を返す
  @override
  bool changeTurn() {
    clearHint();
    Stone nextTurn = _turn == Stone.white ? Stone.black : Stone.white;
    if (_canPut(nextTurn)) {
      _turn = nextTurn;
      return true;
    }
    // もう一度同じ人のターン
    return _canPut(_turn);
  }

  bool _canPut(Stone stone) {
    for (int row = 0; row < boardRows; row++) {
      for (int column = 0; column < boardColumns; column++) {
        if (_board[row][column] == Stone.blank) {
          if (getReversePositions(row, column, stone).isNotEmpty) {
            return true;
          }
        }
      }
    }
    return false;
  }
ヒント
置ける場所を可視化するためのヒントを設定します。白を置ける場合はStone.whiteHint、黒を置ける場合はStone.blackHintを設定します。
また、次のターンに移るときにヒントをクリアするために、clearHint も作成します。
  /// 現在のターンで配置可能な場所にヒントを設定する
  @override
  void hint() {
    for (int row = 0; row < boardRows; row++) {
      for (int column = 0; column < boardColumns; column++) {
        if (_board[row][column] == Stone.blank) {
          if (getReversePositions(row, column, _turn).isNotEmpty) {
            _board[row][column] = _turn == Stone.black ? Stone.blackHint : Stone.whiteHint;
          }
        }
      }
    }
  }

  /// ヒントをクリアする
  @override
  void clearHint() {
    for (int row = 0; row < boardRows; row++) {
      for (int column = 0; column < boardColumns; column++) {
        if (_board[row][column] == Stone.blackHint || _board[row][column] == Stone.whiteHint) {
          _board[row][column] = Stone.blank;
        }
      }
    }
  }
ゲーム画面のUIを作り込む
ここからは、最初に作成したGameWidgetを作り込んでいきます。
ロジックを受け取る
GameWidgetがGameLogicInterfaceを受け取るようにします。
GameLogicではなく、GameLogicInterfaceを受け取るのがポイントです。また、インスタンスをコンストラクタで受け取っています。これはDI(Dependency Injection)という手法です。
インターフェースを外から受け取ることによって、GameWidgetクラスはGameLogicのことを全く知らなくても動作します。GameLogicの実装が変わっても、GameWidgetへの変更は一切不要です。これがインターフェースに依存させて、外部から注入させる効果です。
/// ゲームのUI
class GameWidget extends StatefulWidget {
  const GameWidget(this._gameLogic, {super.key});

  @override
  State<GameWidget> createState() => _GameWidgetState(_gameLogic);

  final GameLogicInterface _gameLogic;
}

/// ゲームUIのステート
class _GameWidgetState extends State<GameWidget> {
  _GameWidgetState(this._gameLogic);

  @override
  initState() {
    super.initState();

    _gameLogic.init();
  }

  final GameLogicInterface _gameLogic;
}main.dartでGameLogicのインスタンスを作成して、GameWidgetに渡してあげます。どこかでは必ずインスタンスを生成する必要がありますので、MyAppでやっています。なので、MyAppはGameLogicの変更をもろに受けてしまいますが、そういう層がどこかに必要になります。
class MyApp extends StatelessWidget {
  MyApp({super.key});

  // This widget is the root of your application.
  @override
  Widget build(BuildContext context) {
    return MaterialApp(
      title: 'Reversi',
      theme: ThemeData(
        primarySwatch: Colors.blue,
      ),
      routes: {
        'title': (context) => const TitleWidget(),
        'game': (context) => GameWidget(_gameLogic),
      },
      home: const TitleWidget(),
    );
  }

  final GameLogicInterface _gameLogic = GameLogic();
}
スクリーンサイズを取得する
スクリーンのサイズはMediaQuery.of(context).sizeで取得できます。AppBarを表示している場合は、そのサイズも考慮する必要があります。
/// スクリーンのサイズを取得する
Size _getScreenSize(BuildContext context) {
  final double appBarHeight = AppBar().preferredSize.height;
  final double screenWidth = MediaQuery.of(context).size.width;
  final double screenHeight = MediaQuery.of(context).size.height - appBarHeight;
  return Size(screenWidth, screenHeight);
}
盤面のサイズを決める
スクリーンサイズの短い方のサイズに合わせて盤面のサイズを決定します。スマホのような縦長の画面の場合には、スクリーンの幅を盤面のサイズとしています。
/// 盤面のサイズを取得する
double _getBoardSize(BuildContext context) {
  final Size screenSize = _getScreenSize(context);
  final double boardSize = screenSize.width < screenSize.height ? screenSize.width  : screenSize.height - 10.0;
  return boardSize;
}
盤面の表示
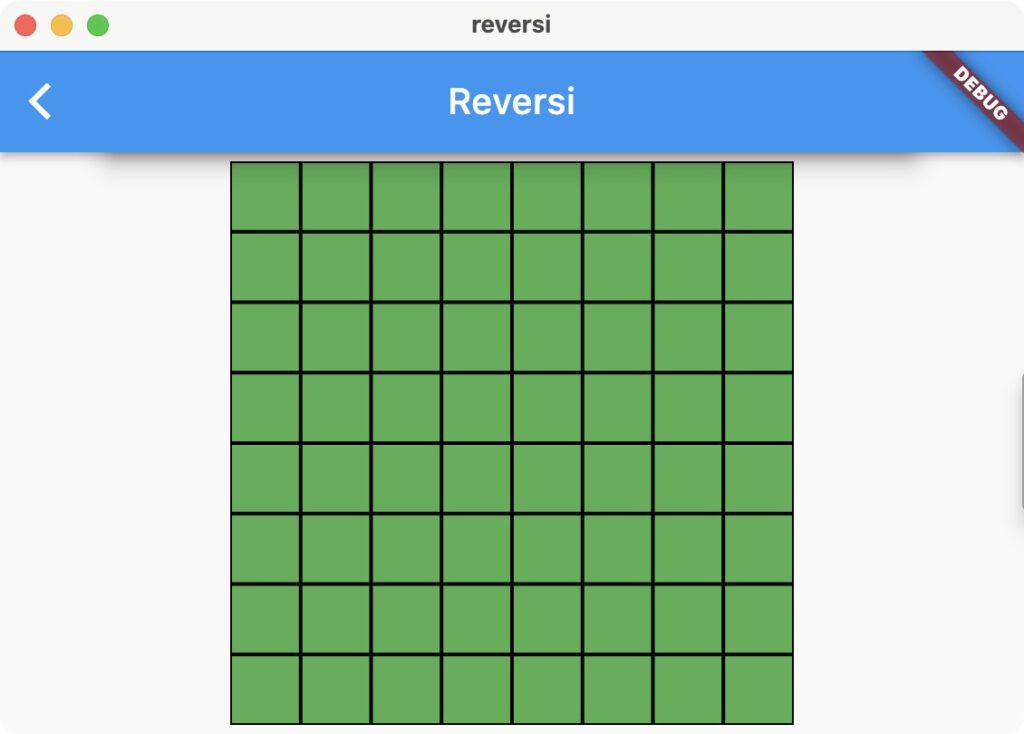
8行×8列分の領域を作って、中を緑で塗りつぶしています。
class _GameWidgetState extends State<GameWidget> {

  ...

  @override
  Widget build(BuildContext context) {
    return Scaffold(
      appBar: AppBar(
        title: const Text('Reversi'),
      ),
      body: Center(
        child: _buildBoard(context),
      ),
    );
  }

  /// 盤面を表示する
  Widget _buildBoard(BuildContext context) {
    final double boardSize = _getBoardSize(context);

    int rows = _gameLogic.boardRows;
    int columns = _gameLogic.boardColumns;

    return Container(
      margin: const EdgeInsets.all(5.0),
      color: Colors.black,
      width: boardSize,
      height: boardSize,
      child: Column(children: <Widget>[
        for (int row = 0; row < rows; row++) ... {
          Expanded(
            child: Row(
              children: <Widget> [
                for (int column = 0; column < columns; column++) ... {
                  Expanded(
                    child: Container(
                      margin: const EdgeInsets.all(1.0),
                      color:Colors.green,
                    ),
                  )
                }
              ]
            )
          )
        }
      ])
    );
  }
}
石の表示
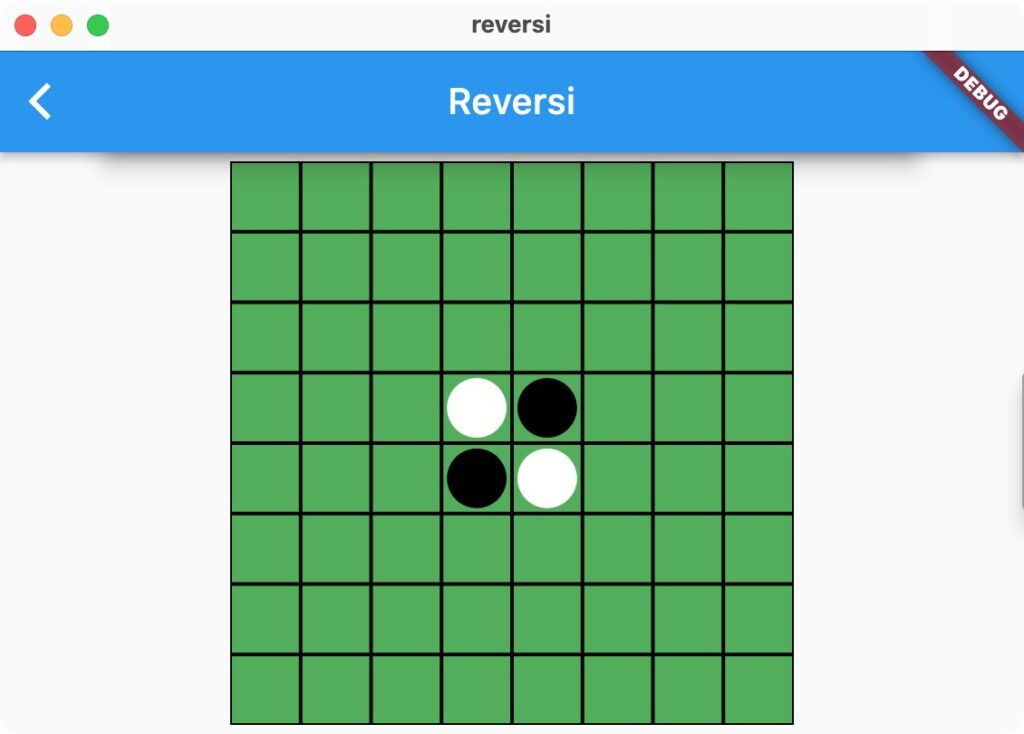
丸い石を表示したいのですが、四角を表示するBoxDecorationを利用します。borderRadiusに角丸の半径を設定することで、丸くできます。
  Widget _buildStone(BuildContext context, int row, int column) {
    final double boardSize = _getBoardSize(context);
    final double squareSize = boardSize / _gameLogic.boardRows;
    final Stone stone = _gameLogic.getStone(row, column);
    if (stone == Stone.blank) {
      return Container();
    }
    else {
      return Container (
        margin: const EdgeInsets.all(2.0),
        decoration: BoxDecoration(
          borderRadius: BorderRadius.circular(squareSize/2),
          color: stone == Stone.black ? Colors.black : Colors.white,
        ),
      );
    }
  }
盤面に石を表示させます。
  Widget _buildBoard(BuildContext context) {
    final double boardSize = _getBoardSize(context);

    int rows = _gameLogic.boardRows;
    int columns = _gameLogic.boardColumns;

    return Container(
      margin: const EdgeInsets.all(5.0),
      color: Colors.black,
      width: boardSize,
      height: boardSize,
      child: Column(children: <Widget>[
        for (int row = 0; row < rows; row++) ... {
          Expanded(
            child: Row(
              children: <Widget> [
                for (int column = 0; column < columns; column++) ... {
                  Expanded(
                    child: Container(
                      margin: const EdgeInsets.all(1.0),
                      color:Colors.green,
                      child: _buildStone(context, row, column),
                    ),
                  )
                }
              ]
            )
          )
        }
      ])
    );
  }
石をおくボタンの表示
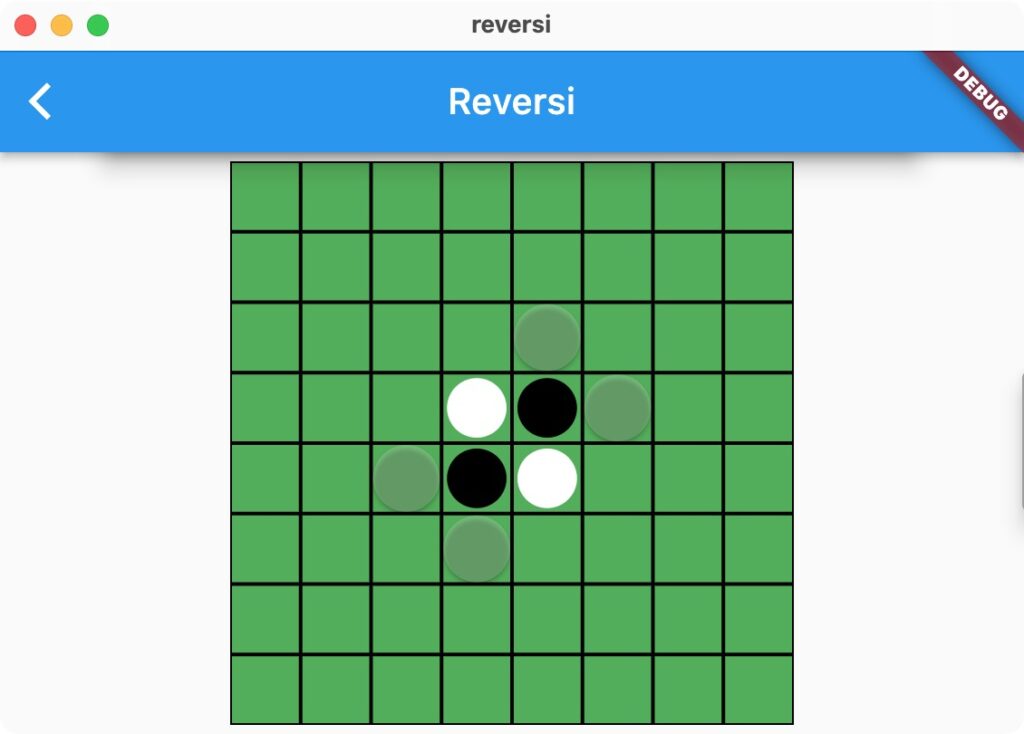
Stone.blackHintかStone.whiteHintのときにボタンを表示します。あまり主張したくないので、.withOpacity(0.2)で半透明にしています。
onPressedでボタンが押されたときのコールバックを呼び出します。説明は次項で行います。
  Widget _buildStone(BuildContext context, int row, int column) {
    final double boardSize = _getBoardSize(context);
    final double squareSize = boardSize / _gameLogic.boardRows;
    final Stone stone = _gameLogic.getStone(row, column);

    if (stone == Stone.blank) {
      return Container();
    }
    else if (stone == Stone.blackHint || stone == Stone.whiteHint) {
      final Color stoneColor = stone == Stone.blackHint ? Colors.black : Colors.white;
      return SizedBox(
        width: squareSize,
        height: squareSize,
        child: ElevatedButton (
          style: ElevatedButton.styleFrom(shape: const CircleBorder(), backgroundColor: stoneColor.withOpacity(0.2)),
          child: const Text(''),
          onPressed: () { _putStone(row, column); },
        ),
      );
    }
    else {
      return Container (
        margin: const EdgeInsets.all(2.0),
        decoration: BoxDecoration(
          borderRadius: BorderRadius.circular(squareSize/2),
          color: stone == Stone.black ? Colors.black : Colors.white,
        ),
      );
    }
  }
ボタンが押されたら石を置いて、挟んだ石を裏返す
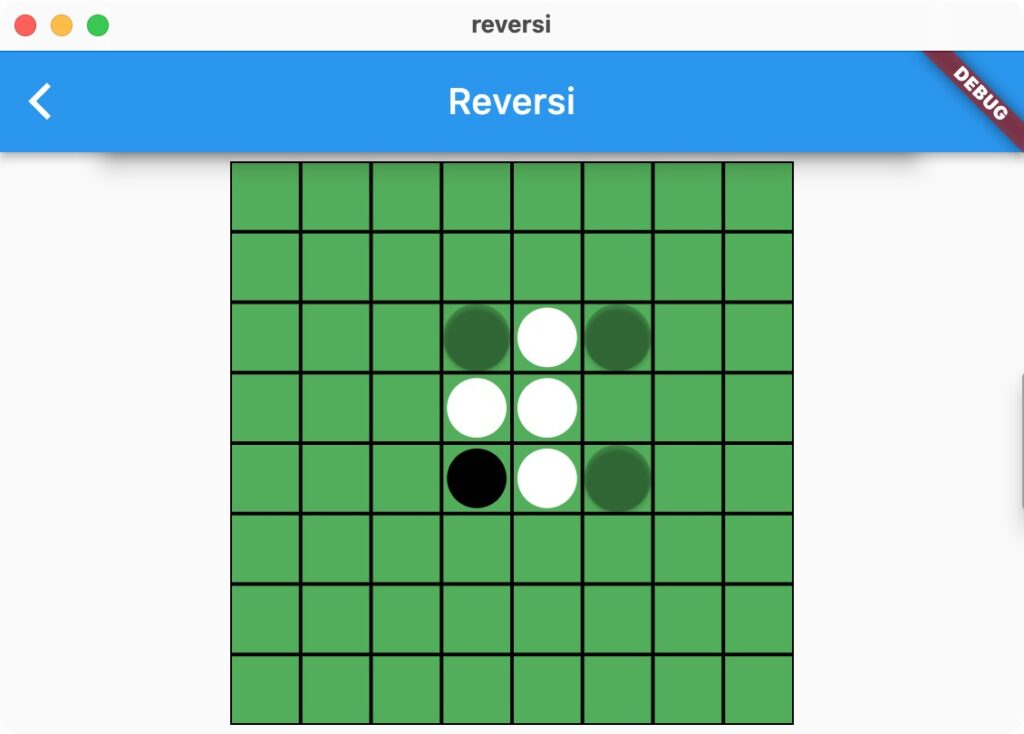
ボタンが押されたら、挟んだ石を裏返します。setState()は表示を更新する関数です。GameLogicの盤面の状態を変更するので、それに合わせて画面を再描画します。
  void _putStone(int row, int column){
    List<Position> reversePositions = _gameLogic.getReversePositions(row, column, _gameLogic.turn);
    if (reversePositions.isNotEmpty) {
      setState(() {
        // ヒントをクリア
        _gameLogic.clearHint();
        // 石を置く
        _gameLogic.putStone(row, column, _gameLogic.turn);
        // はさんだ石を裏返す
        for (Position position in reversePositions) {
          _gameLogic.reverseStone(position.row, position.column);
        }
        // 次のターンへ
        _gameLogic.changeTurn();
        // ヒントを表示する
        _gameLogic.hint();
      });
    }
  }
FlipCardで石を裏返すアニメーションをつける
パッと表示が変わると味気ないので、石を裏返すアニメーションをつけます。ちょうど良いflip_cardパッケージがありましたので、それを使用します。あるものは使って楽をするのがプログラマーのサガです。
flip_cardを使えるようにpubspec.yamlにパッケージを追加します。pubspec.yamlを開いてflip_card: ^0.7.0を追加するだけです。これで準備完了です。
dependencies:
  flutter:
    sdk: flutter
  flip_card: ^0.7.0
カードを裏返すためのコントローラーを初期化します。ちょっと勿体無いですけど、8×8マス分のコントローラーを作成しています。
class _GameWidgetState extends State<GameWidget> with TickerProviderStateMixin {
  ...
  late List<List<FlipCardController>> _stoneFlipControllers;

  @override
  initState() {
    ...
    // 石を裏返すためのコントローラーを生成
    _stoneFlipControllers = List.generate(
      _gameLogic.boardRows,
      (int index) => List.generate(
        _gameLogic.boardColumns,
        (int index) => FlipCardController()
      )
    );
    ..
}石の表示にFlipCardを使います。FlipCardは表面と裏面の表示物を設定します。
direction: FlipDirection.HORIZONTALは水平方向に裏返す設定です。垂直方向にも裏返すことができます。
controller: _stoneFlipControllers[row][column]でコントローラーを割り当てます。
speed: 200は裏返す時間(ミリ秒)です。
  Widget _buildStone(BuildContext context, int row, int column) {
    ...

    if (stone == Stone.blank) {
      ...
    }
    else if (stone == Stone.blackHint || stone == Stone.whiteHint) {
      ...
    }
    else {
      return FlipCard(
        direction: FlipDirection.HORIZONTAL,
        controller: _stoneFlipControllers[row][column],
        speed: 200,
        flipOnTouch: false,
        front: Container (
          margin: const EdgeInsets.all(2.0),
          decoration: BoxDecoration(
            borderRadius: BorderRadius.circular(squareSize/2),
            color: stone == Stone.black ? Colors.black : Colors.white,
          ),
        ),
        back: Container (
          margin: const EdgeInsets.all(2.0),
          decoration: BoxDecoration(
            borderRadius: BorderRadius.circular(squareSize/2),
            color: stone == Stone.black ? Colors.white : Colors.black,
          ),
        ),
      );
    }
}_putStoneにアニメーションを追加します。アニメーションを時系列順に行っていくために、非同期処理に変更しました。
非同期処理の解説は別途記事を用意します。
  Future<void> _putStone(int row, int column) async {
    if (_animationPlaying) {
      return;
    }
    List<Position> reversePositions = _gameLogic.getReversePositions(row, column, _gameLogic.turn);
    if (reversePositions.isNotEmpty) {
      _animationPlaying = true;
      setState(() {
        // ヒントをクリアする
        _gameLogic.clearHint();
        // 石をおく
        _gameLogic.putStone(row, column, _gameLogic.turn);
      });
      // 200ミリ秒待機
      await Future.delayed(const Duration(milliseconds: 200));
      for (Position position in reversePositions) {
        // 挟んだ石を裏返すアニメーションを開始する
        _stoneFlipControllers[position.row][position.column].toggleCard();
        // 250ミリ秒待機
        await Future.delayed(const Duration(milliseconds: 250));
        setState(() {
          // 内部的に石を裏返す
          _gameLogic.reverseStone(position.row, position.column);
          // FlipCardの表と裏が逆になるので、アニメーションなしでカードを裏返しておく
          _stoneFlipControllers[position.row][position.column].toggleCardWithoutAnimation();
        });
      }
      // 200ミリ秒待機
      await Future.delayed(const Duration(milliseconds: 200));
      setState(() {
        // 次のターンへ
        _gameLogic.changeTurn();
        // ヒントを表示する
        _gameLogic.hint();
      });
    }
  }
現在のターンをカードで表示
ターン切り替え時に、次はどちらのターンなのかをカードで表示します。
カードをアニメーションさせるために、AnimationとAnimationControllerを初期化します。
class _GameWidgetState extends State<GameWidget> with TickerProviderStateMixin {
  ...
  late Animation<double> _turnCardAnimation;
  late AnimationController _turnCardAnimationController;

  @override
  initState() {
    ...
    // ターンをあらわすカードのアニメーション
    _turnCardAnimationController = AnimationController(
      duration: const Duration(milliseconds: 1000),
      vsync: this,
    );

    _turnCardAnimation = TweenSequence<double>([
      // 左から中央にきて
      TweenSequenceItem<double>(
        tween: Tween(begin: 0.0, end: 0.5).chain(CurveTween(curve: Curves.ease)),
        weight: 15,
      ),
      // 一定時間停止して
      TweenSequenceItem<double>(
        tween: ConstantTween<double>(0.5),
        weight: 70,
      ),
      // 中央から右にはける
      TweenSequenceItem<double>(
        tween: Tween(begin: 0.5, end: 1.0).chain(CurveTween(curve: Curves.ease)),
        weight: 15,
      ),
    ]).animate(_turnCardAnimationController)
      ..addListener(() {
        setState(() {});
      })
      ..addStatusListener((status) {
        if (status == AnimationStatus.completed) {
          // アニメーションが終わったら次の順番のヒントを表示する
          _animationPlaying = false;
          _gameLogic.hint();
        }
      });
    ...

    // 最初のターンの通知
    _animationPlaying = true;
    Future.delayed(const Duration(seconds: 1), () {
      _turnCardAnimationController.forward();
    });
  }
  ...
}
カードを表示するWidgetを生成します。
  Widget _buildTurnCard(BuildContext context) {
    final double cardWidth = _getBoardSize(context) / 2;
    final double cardHeight = cardWidth / 2;
    final double fontSize = cardWidth / 8;

    final Size screenSize = _getScreenSize(context);

    final distance = screenSize.width + cardWidth ;
    final double x = -cardWidth -5 + _turnCardAnimation.value * distance ;
    final double y = screenSize.height / 2 - cardHeight / 2 - 5;

    return Positioned(
      left: x,
      top: y,
      child: Card(
        color: Colors.grey,
        elevation: 10,
        shadowColor: Colors.black,
        child: SizedBox(
          width: cardWidth,
          height: cardHeight,
          child: Center(
            child: Text(
              '● の番です。',
              style: TextStyle(
                fontSize: fontSize,
                color: _gameLogic.turn == Stone.black ? Colors.black : Colors.white,
              )
            )
          ),
        )
      )
    );
}盤面の上に表示したいので、Stackを利用します。
  @override
  Widget build(BuildContext context) {

    return Scaffold(
      appBar: AppBar(
        title: const Text('Reversi'),
      ),
      body: Stack(
        children: <Widget>[
          Center(
            child: _buildBoard(context),
          ),
          _buildTurnCard(context),
        ],
      ),
    );
  }
石をおいたときに、ターン表示のアニメーションを行うようにします。
  Future<void> _putStone(int row, int column) async {
    ...
      setState(() {
        if (_gameLogic.changeTurn()) {
          // 次のターンのカードを表示
          _turnCardAnimationController.reset();
          _turnCardAnimationController.forward();
        }
      });
    ...
  }
ゲーム終了のカードを表示
こちらもターン表示と同様にカードで表示します。
カードをアニメーションさせるために、AnimationとAnimationControllerを初期化します。
class _GameWidgetState extends State<GameWidget> with TickerProviderStateMixin {
  ...
  late Animation<double> _finishCardAnimation;
  late AnimationController _finishCardAnimationController;

  @override
  initState() {
    ...
    // 終了アニメーション
    _finishCardAnimationController = AnimationController(
      duration: const Duration(milliseconds: 500),
      vsync: this,
    );

    _finishCardAnimation = TweenSequence<double>([
      TweenSequenceItem<double>(
        tween: Tween(begin: 0.0, end: 0.5).chain(CurveTween(curve: Curves.easeIn)),
        weight: 60,
      ),
      TweenSequenceItem<double>(
        tween: Tween(begin: 0.5, end: 0.4).chain(CurveTween(curve: Curves.easeOut)),
        weight: 20,
      ),
      TweenSequenceItem<double>(
        tween: Tween(begin: 0.4, end: 0.5).chain(CurveTween(curve: Curves.easeIn)),
        weight: 20,
      ),
    ]).animate(_finishCardAnimationController)
      ..addListener(() {
        setState(() {});
      });
    ...
  }
}
カードを生成するWidgetを生成します。
  Widget _buildFinishCard(BuildContext context) {
    final Size screenSize = _getScreenSize(context);
    final double cardWidth = screenSize.width * 0.8;
    final double cardHeight = cardWidth * 0.5;
    final double titleSize = cardWidth / 8;
    final double fontSize = titleSize * 0.7;

    final distance = screenSize.height + cardHeight;
    final double x = (screenSize.width - cardWidth) / 2 - 5;
    final double y = -cardHeight -5 + distance * _finishCardAnimation.value;

    int numberOfWhite = _gameLogic.numberOfStone(Stone.white);
    int numberOfBlack = _gameLogic.numberOfStone(Stone.black);
    String result = numberOfWhite != numberOfBlack ? '● のかち' : 'ひきわけ';
    Color resultColor = numberOfWhite > numberOfBlack ? Colors.white : Colors.black;

    return Positioned(
      left: x,
      top: y,
      child: Card(
        color: Colors.grey.withOpacity(0.8),
        elevation: 10,
        shadowColor: Colors.black,
        child: SizedBox(
          width: cardWidth,
          height: cardHeight,
          child: Column(
            children: <Widget> [
              Text(
                result,
                style: TextStyle(
                  fontSize: titleSize,
                  color: resultColor,
                ),
              ),
              Text(
                '●:$numberOfWhite',
                style: TextStyle(
                  fontSize: fontSize,
                  color: Colors.white,
                ),
              ),
              Text(
                '●:$numberOfBlack',
                style: TextStyle(
                  fontSize: fontSize,
                  color: Colors.black,
                ),
              ),
            ],
          ),
        )
      )
    );
}盤面の上に表示したいので、Stackを利用します。
  @override
  Widget build(BuildContext context) {

    return Scaffold(
      appBar: AppBar(
        title: const Text('Reversi'),
      ),
      body: Stack(
        children: <Widget>[
          Center(
            child: _buildBoard(context),
          ),
          _buildTurnCard(context),
          _buildFinishCard(context),
        ],
      ),
    );
  }
ゲーム終了時にカードを表示します。
  Future<void> _putStone(int row, int column) async {
    ...
      setState(() {
        if (_gameLogic.changeTurn()) {
          // 次のターンのカードを表示
          _turnCardAnimationController.reset();
          _turnCardAnimationController.forward();
        } else {
          // ゲームオーバー
          _finishCardAnimationController.forward();
        }
      });
    ...
  }
どちらかが勝ったら紙吹雪をちらす
カードの表示だけだと味気ないので、どちらかが勝ったときに紙吹雪をちらします。ちょうど良いconfettiパッケージがありましたので、それを使用します。
confettiを使えるようにpubspec.yamlにパッケージを追加します。pubspec.yamlを開いてconfetti: ^0.6.0-nullsafetysを追加するだけです。これで準備完了です。
dependencies:
  flutter:
    sdk: flutter
  flip_card: ^0.7.0
  confetti: ^0.6.0-nullsafetys
紙吹雪のコントローラーを初期化します。
class _GameWidgetState extends State<GameWidget> with TickerProviderStateMixin {
  ...
  late ConfettiController _confettiController;

  @override
  initState() {
    ...
    // 紙吹雪のコントローラーの初期化
    _confettiController = ConfettiController(
      duration: const Duration(milliseconds: 500),
    );
    ...
  }
  ...
}
紙吹雪のWidgetを生成します。
  Widget _buildConfetti(BuildContext context) {
    final double boardSize = _getBoardSize(context);
    final double minSize = boardSize * 0.02;
    final double maxSize = minSize * 2;

    final Size screenSize = _getScreenSize(context);

    return Positioned(
      left: screenSize.width / 2,
      top: -maxSize,
      child: ConfettiWidget(
        confettiController:_confettiController,
        blastDirectionality: BlastDirectionality.directional,
        blastDirection: -pi / 2,
        emissionFrequency: 0.5,
        numberOfParticles: 5,
        shouldLoop: true,
        maxBlastForce: 4,
        minBlastForce: 2,
        displayTarget: false,
        minimumSize: Size(minSize, minSize),
        maximumSize: Size(maxSize, maxSize),
        gravity: 0.0981,
        particleDrag: 0.001,
      ),
    );
  }
ゲーム終了時に紙吹雪をちらします。
  Future<void> _putStone(int row, int column) async {
    ...
      setState(() {
        if (_gameLogic.changeTurn()) {
          // 次のターンのカードを表示
          _turnCardAnimationController.reset();
          _turnCardAnimationController.forward();
        } else {
          // ゲームオーバー
          _finishCardAnimationController.forward();
          if (_gameLogic.numberOfStone(Stone.white) != _gameLogic.numberOfStone(Stone.black)) {
            _confettiController.play();
          }
        }
      });
    ...
  }
まとめ
長い記事でしたが、最後まで読んでくれてありがとうございます。
プログラムを学ぶ際には、基礎学習の時間を短めにして、とりあえず何かを作ってみるのがおすすめです。必要に迫られたタイミングで部分的に学んでいくことで、学習効率が劇的によくなります。
ぜひあなたも何か作ってみてください。

コメント